Open API & Keys in the left menu to see your store's Sid , Secret and Unauth Token , and to create named API keys that you can rotate or revoke one by one. Webhooks live under Apps & Connectors then Webhooks . Keep the Secret and any secret key on your server and never in browser code. Creating named keys needs the Advanced plan.
Key takeaways
Part 8 of 9 in the Printcart Dashboard tutorial series. Previous: Part 7, Plans, tokens and billing. Next: Part 9, Store profile and brand settings.
What do you need before you start?
- A Printcart store. Each store has its own credentials and keys.
- A server or service that will call the Printcart API or receive webhooks.
The screenshots come from a demo account with a demo store called Demo Print Shop and made-up buyer names. Your store name, products and numbers will differ, but the screens and buttons are the same. Secret values are always hidden in the pictures. The key values in the pictures are blurred and are not real.
How do you manage API keys and webhooks in the Printcart Dashboard?
Step 1Open API & Keys
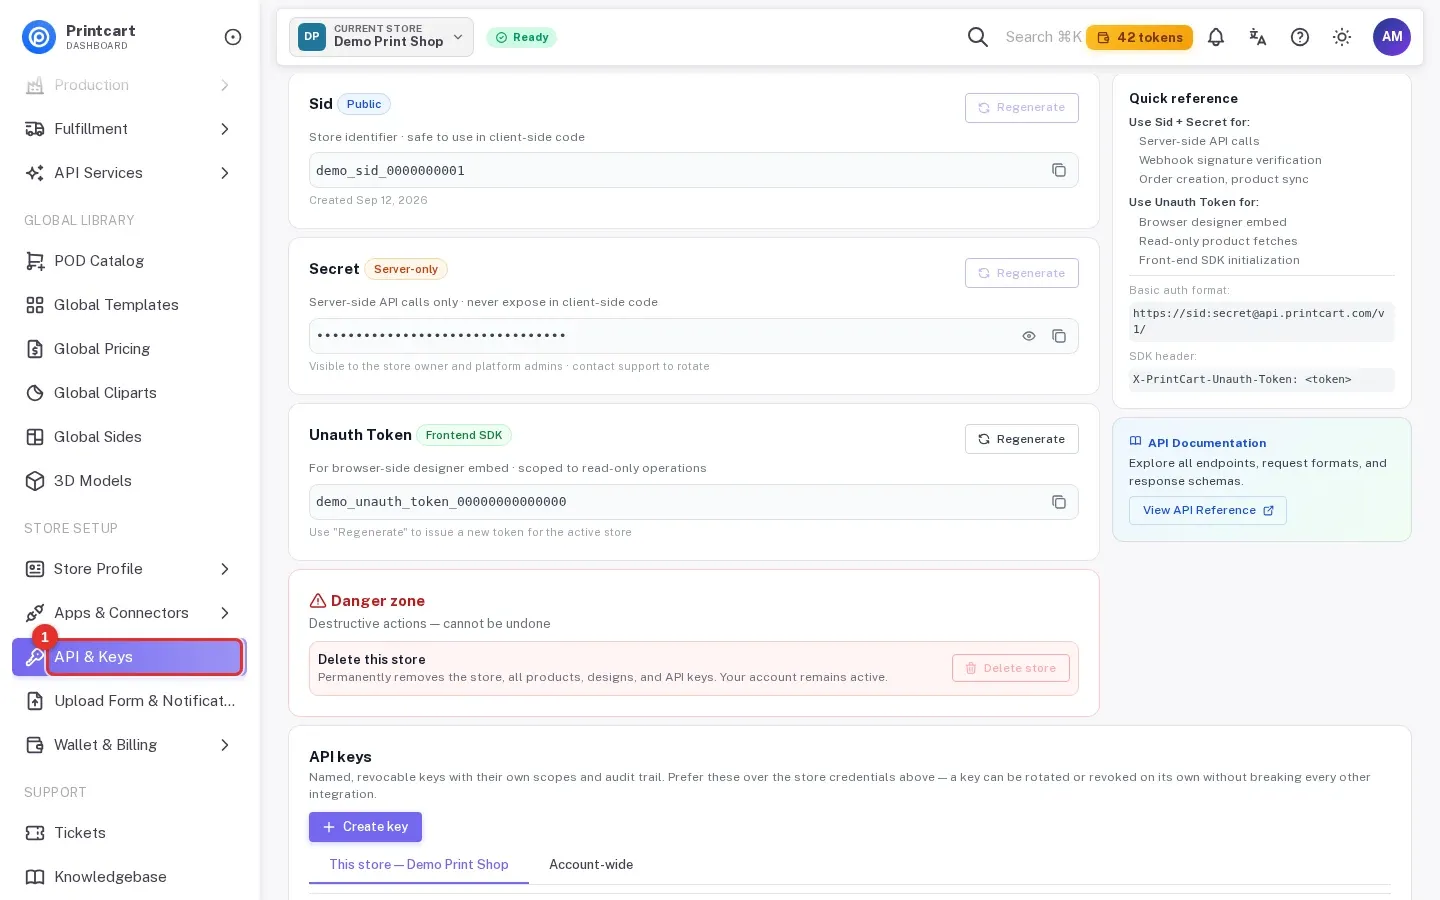
In the left menu, under Store Setup, open API & Keys (www.printcart.com/en/settings).
Expected result: The page API & Keys opens for the store shown in the top bar.
Step 2Know the three store credentials
The first cards hold the credentials every Printcart plugin and app uses. Sid is the public store identifier and is safe in client-side code. Secret is for server-side API calls only; use the eye button to reveal it and the copy button to copy it. Unauth Token is for the browser-side designer embed and read-only calls. The yellow banner repeats the rule: never expose the Secret in client-side code or in a public repository. On the right, a quick reference shows the Basic auth format and the SDK header.
Expected result: You can find, reveal and copy each credential.
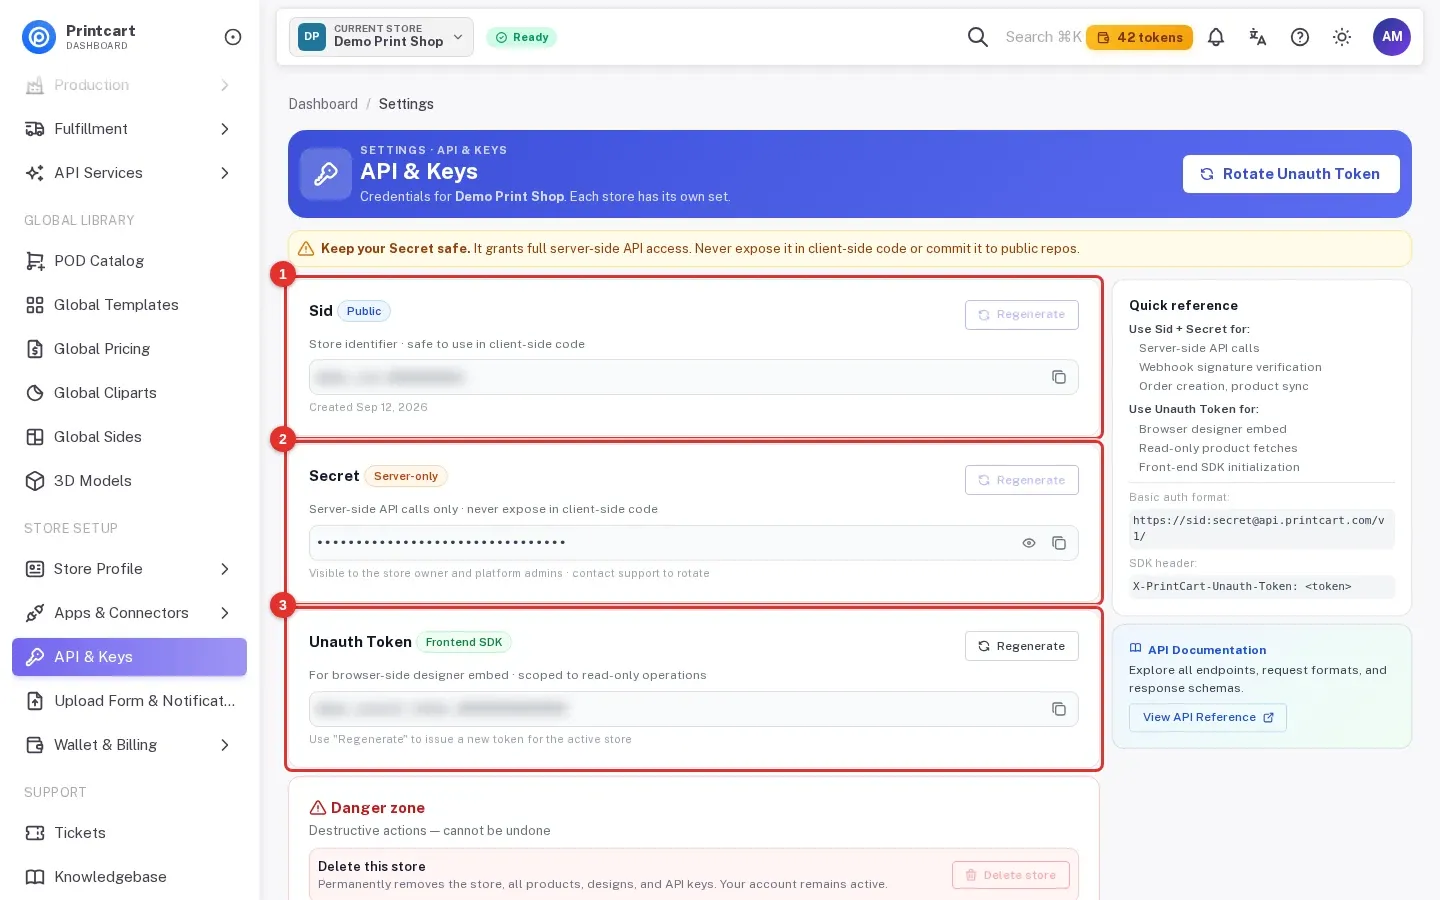
Step 3Rotate the Unauth Token only when you must
Click Rotate Unauth Token if the token has leaked. The dialog warns that the old token stops working at once and that any embedded customizer or SDK using it stays broken until you update it. Click Cancel if you only wanted to look. The Sid cannot be regenerated, and the Secret says to contact support to rotate it.
Expected result: The dialog explains the effect before anything changes.
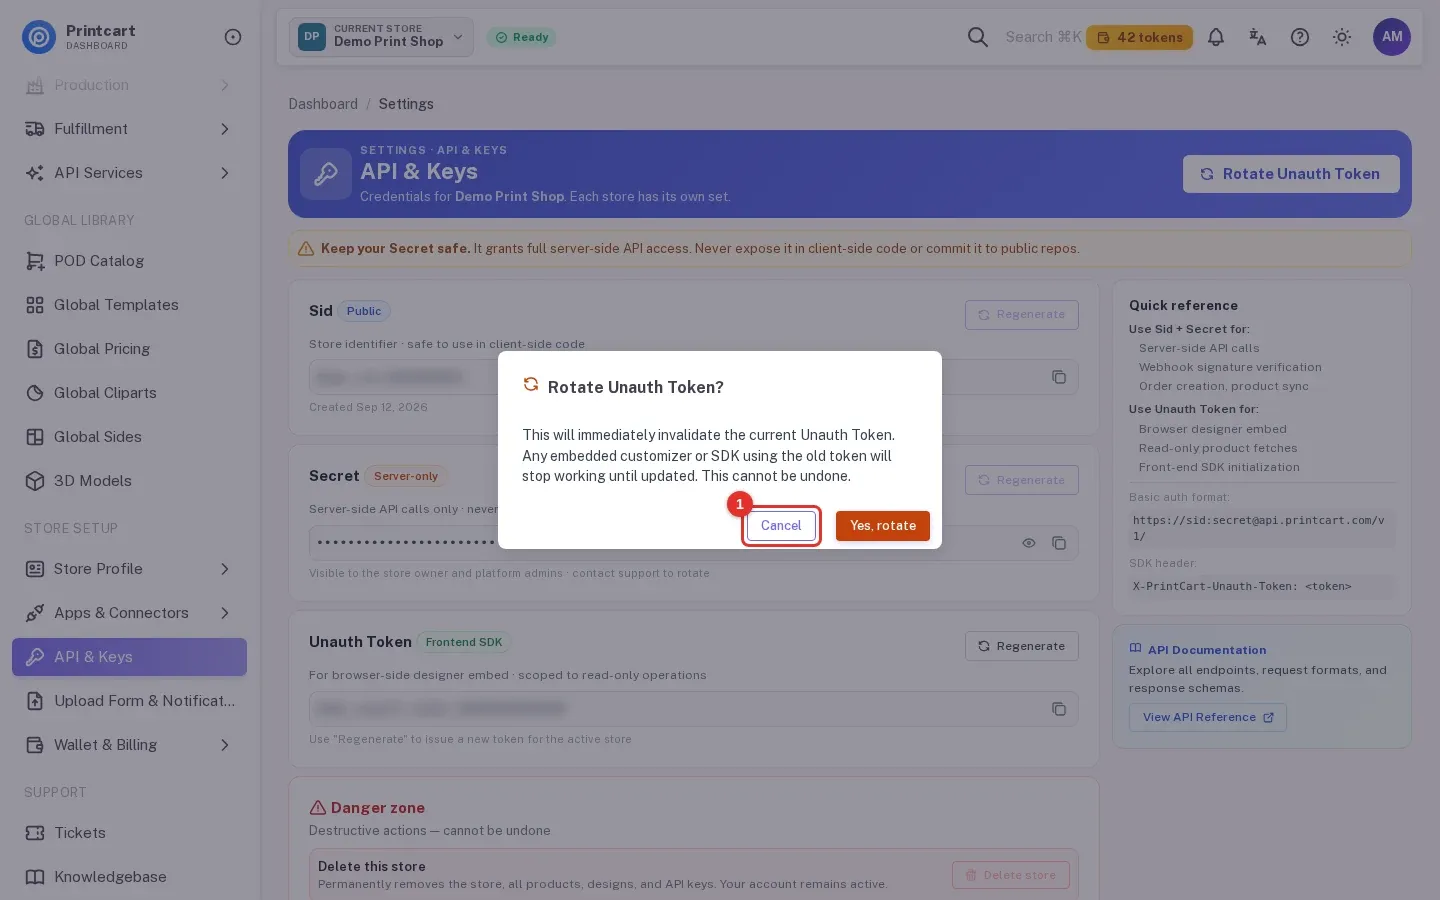
Step 4See the API keys for this store
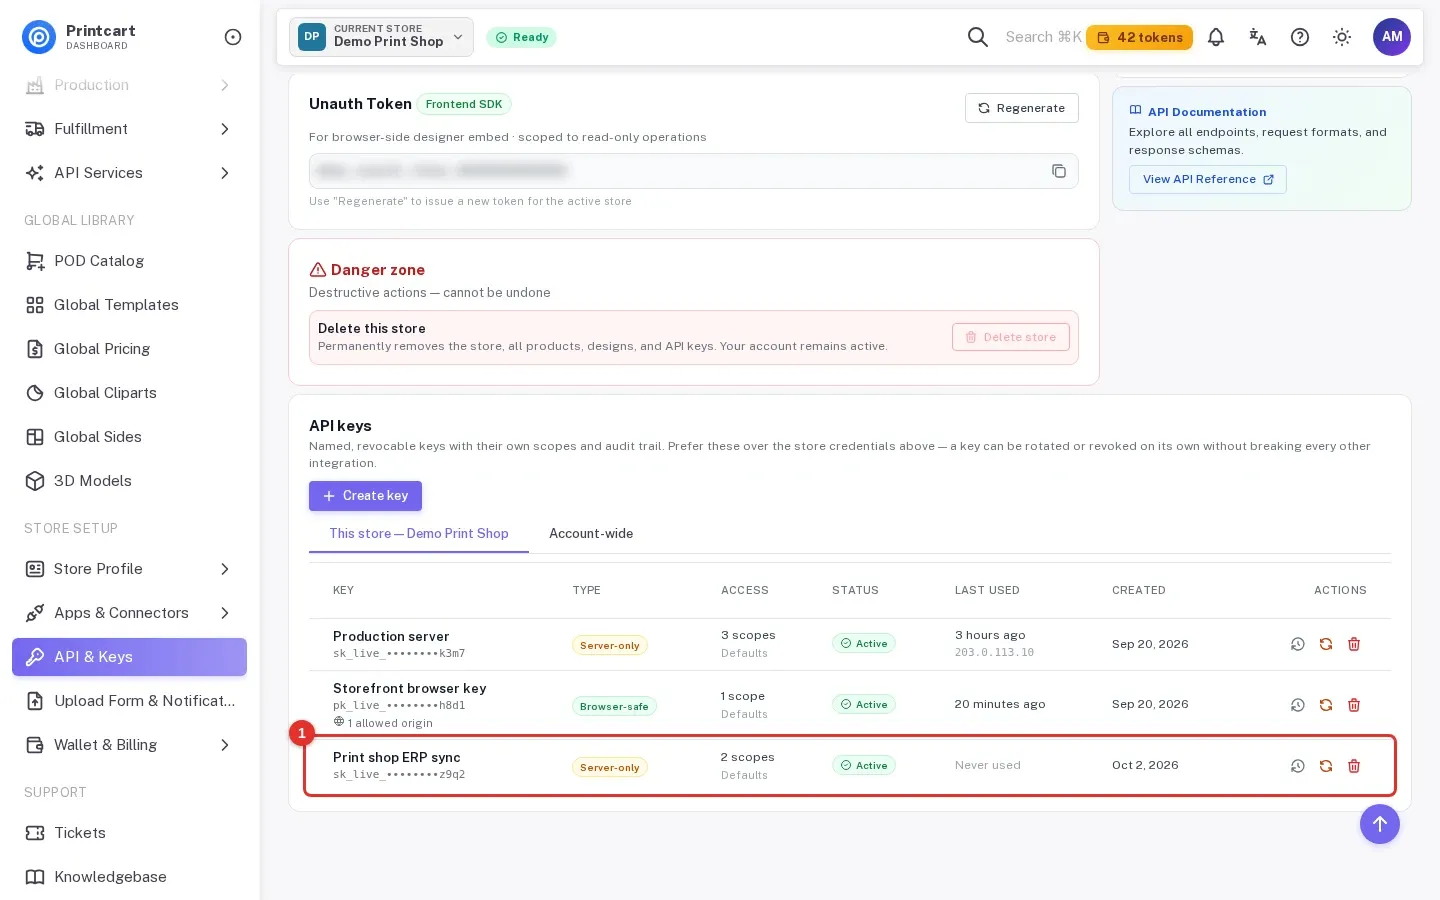
Scroll to API keys. These are named, revocable keys with their own scopes and an audit trail, and the page recommends them over the store credentials above. The tab This store lists keys for the current store and Account-wide lists keys that reach every store on your account. Each row shows the type, the access, the status, when it was last used, and three actions: history, rotate and revoke.
Expected result: The table lists your keys, for example a server key and a browser key.
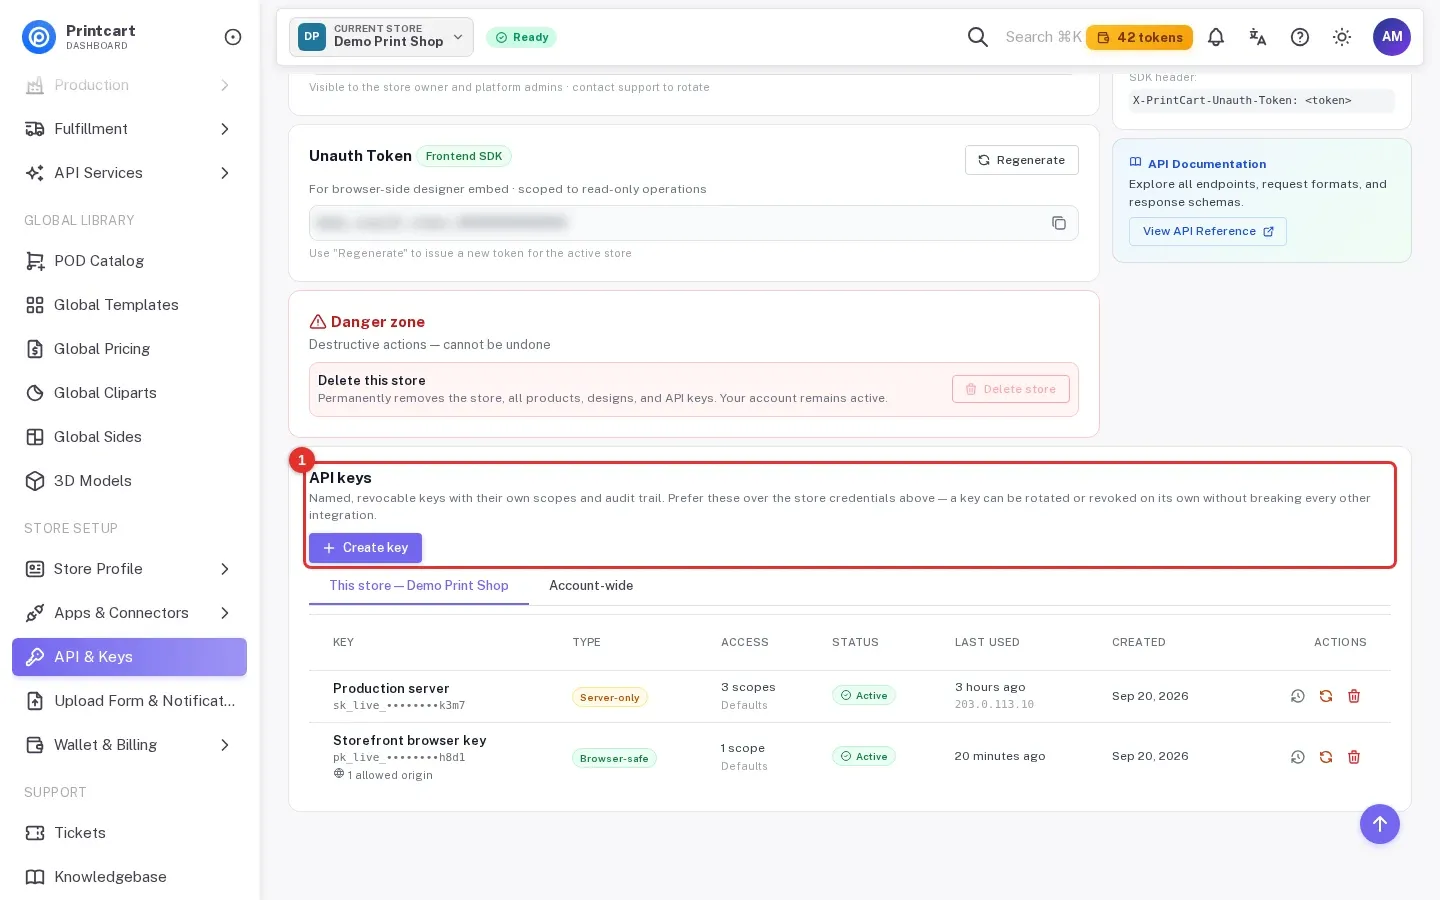
Step 5Create a key
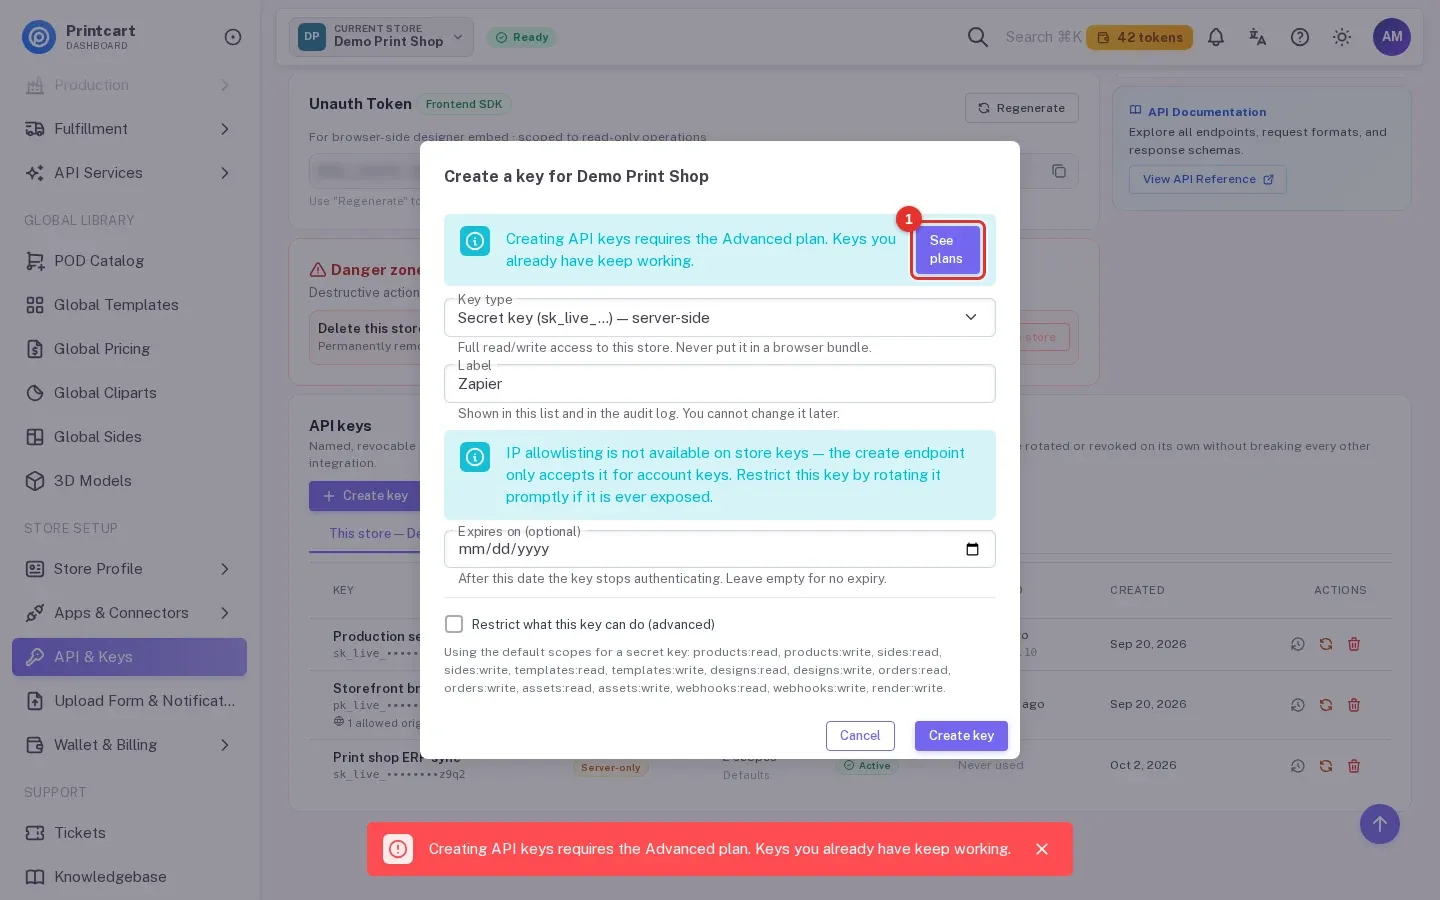
Click Create key. Choose the type: a Secret key (starts with sk_live_, server only) or a Publishable key (starts with pk_live_, safe in a storefront and restricted by an origin list). Type a label so you can tell the key apart later, optionally set an expiry date, and click Create key.
Expected result: The key is created and a second window opens.
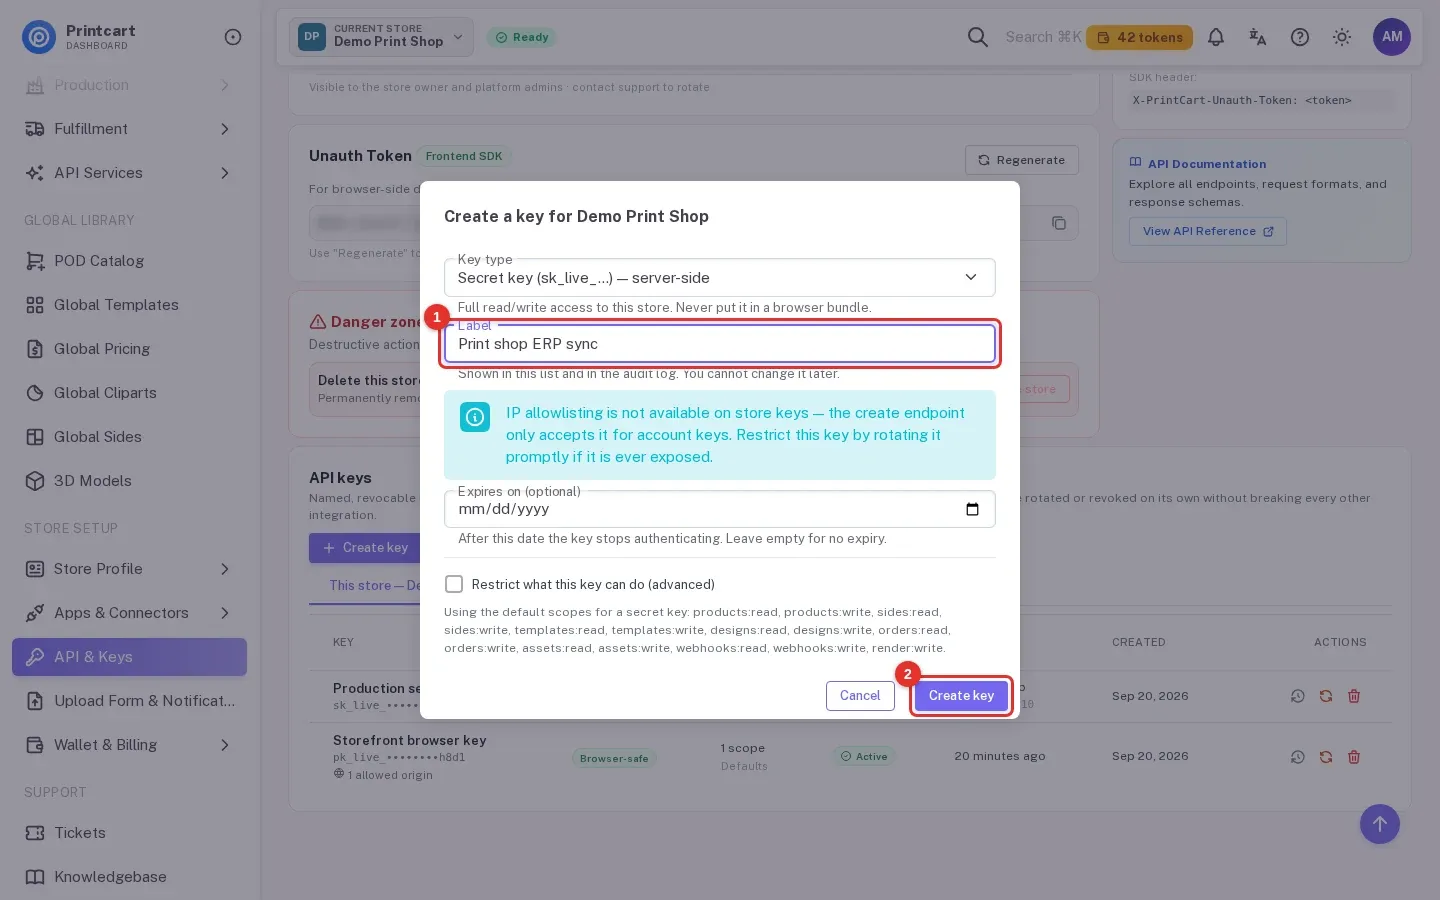
Step 6Copy the key now
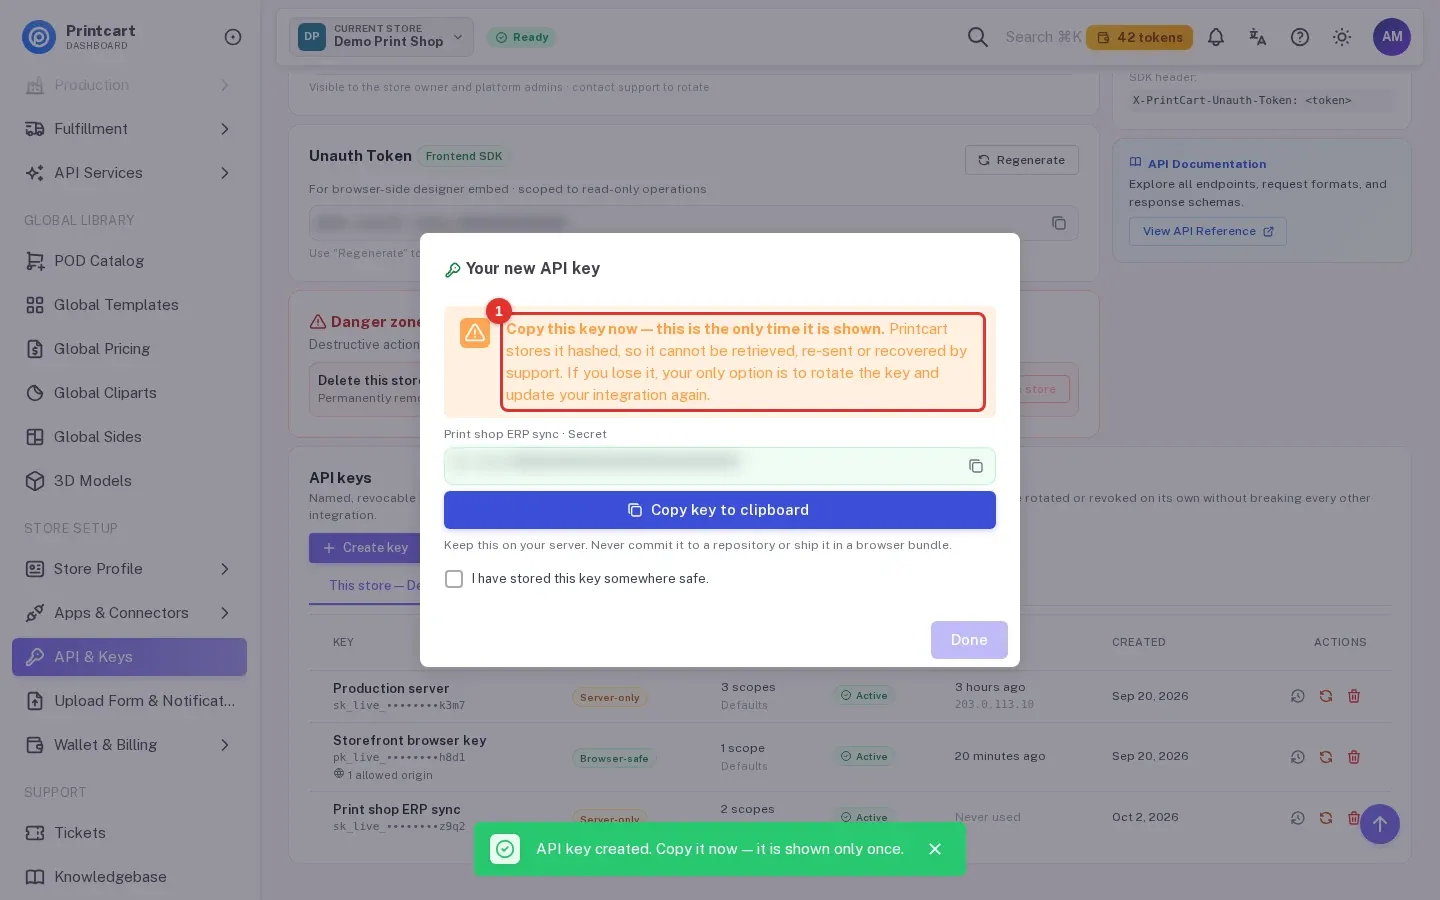
The window Your new API key shows the full key once. Printcart stores only a hash, so nobody can show it again, not even support. Click Copy key to clipboard, store it in your password manager or server settings, tick I have stored this key somewhere safe and click Done.
Expected result: The window closes and the key appears in the table with a masked value.
Step 7Rotate or revoke a key
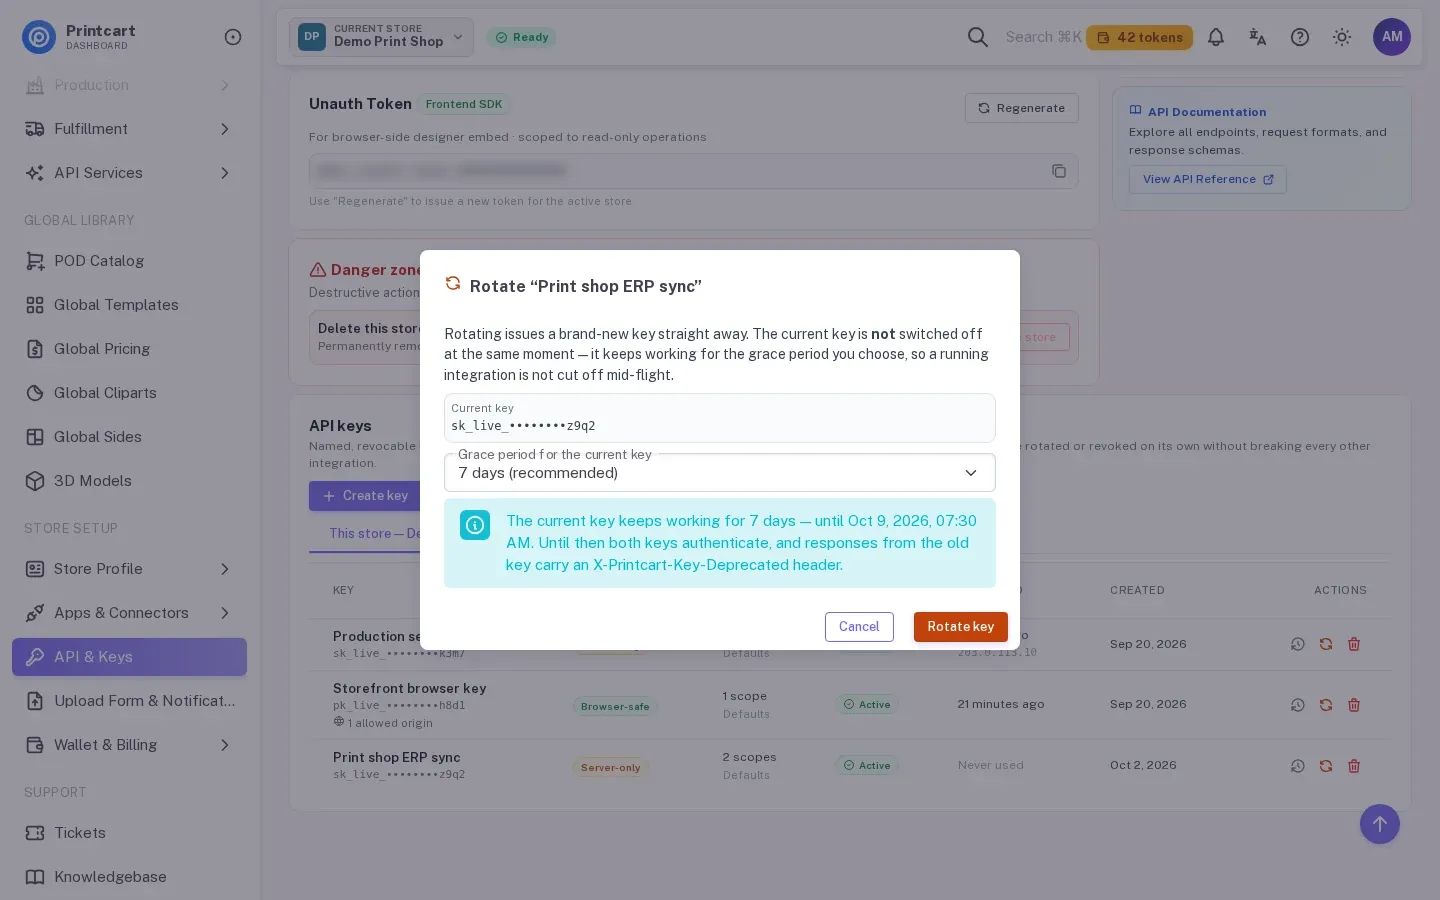
Use the rotate button on a row to issue a replacement. You choose how long the old key keeps working, from no grace at all up to 30 days, and 7 days is the recommended choice, so you can roll the new key out without downtime. Revoking is immediate and cannot be undone, so the dialog asks you to type the key's label first. Open the history button to see events such as created, first used and rotated.
Expected result: The rotate dialog shows the exact moment the current key stops working.
Step 8If your plan is too low
On a store that is not on the Advanced plan, clicking Create key in the dialog shows the message that creating API keys requires the Advanced plan and that keys you already have keep working. Click See plans to open the plans page. The Sid, Secret and Unauth Token on this page keep working on every plan.
Expected result: A notice appears in the dialog with the See plans button, and no key is created.
Step 9Add a webhook
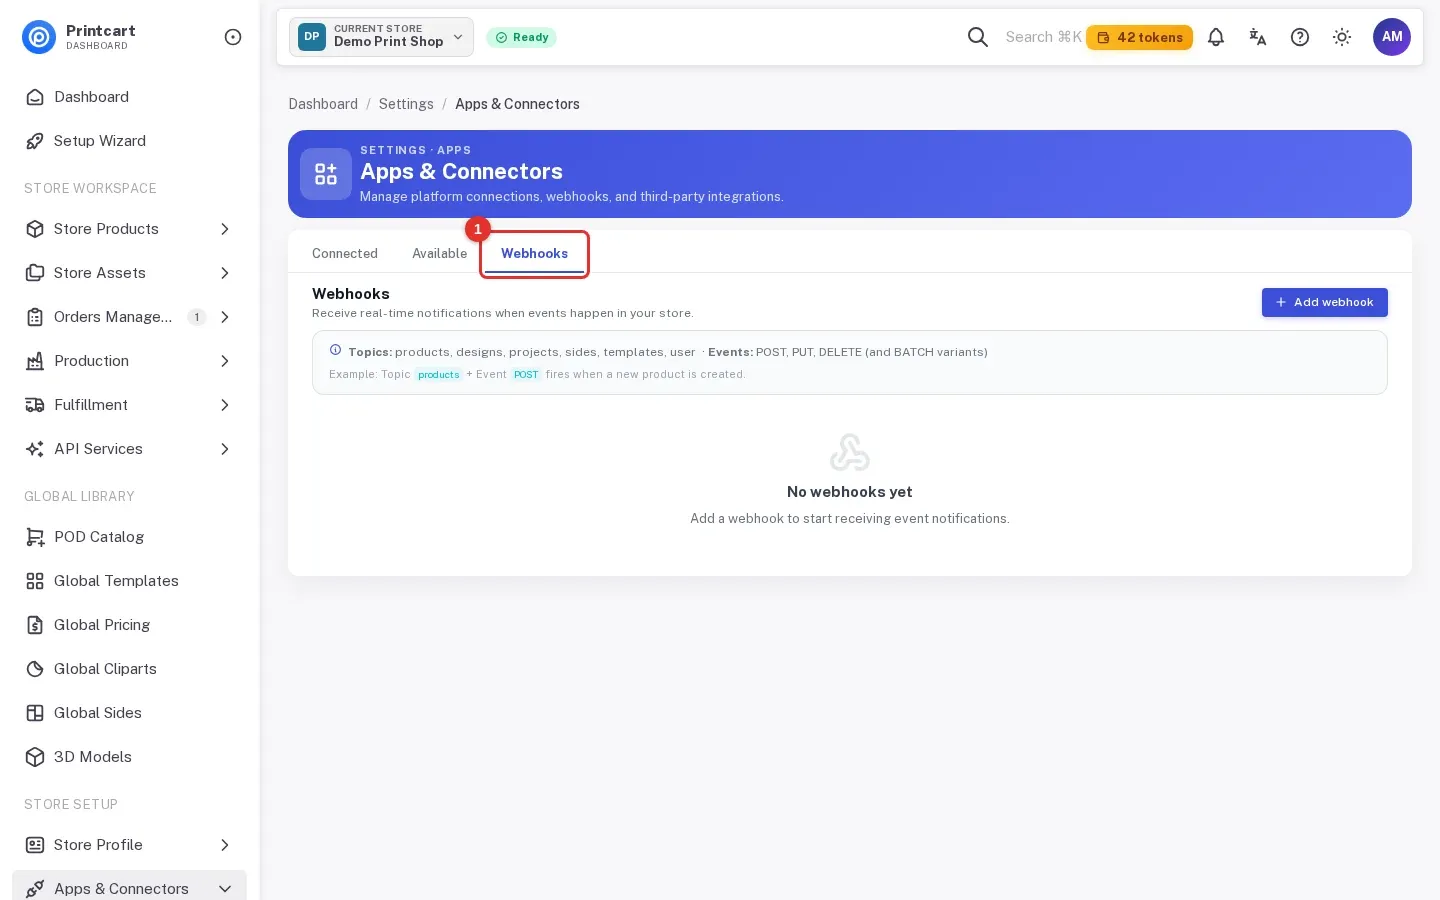
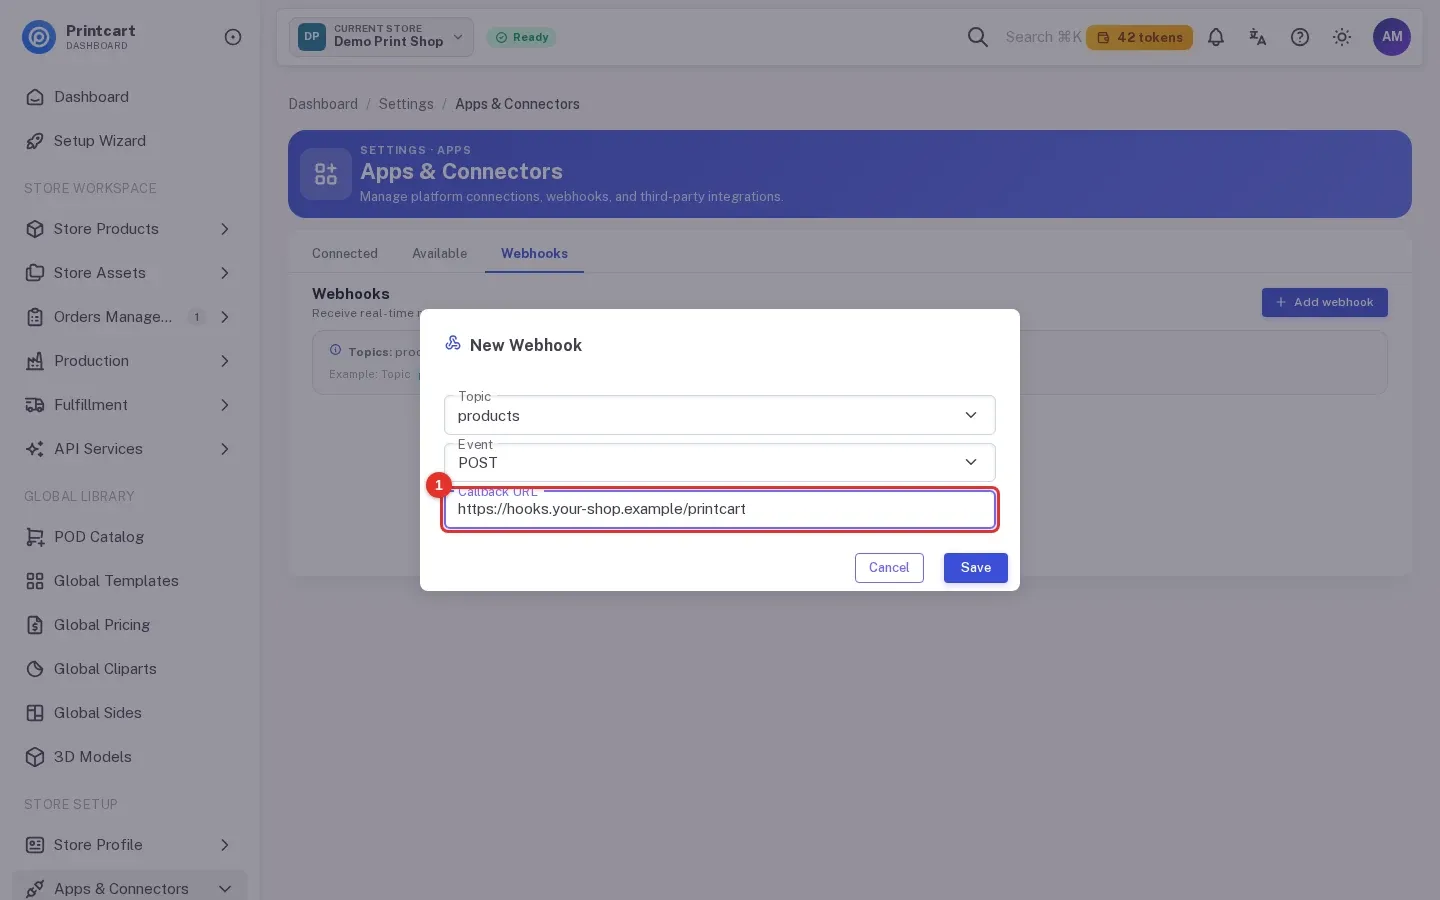
Open Apps & Connectors, then the Webhooks tab, and click Add webhook. Choose a Topic (products, designs, projects, sides, templates or user), an Event (POST, PUT or DELETE, with batch variants) and the Callback URL on your server, then save. For example, topic products with event POST fires when a new product is created.
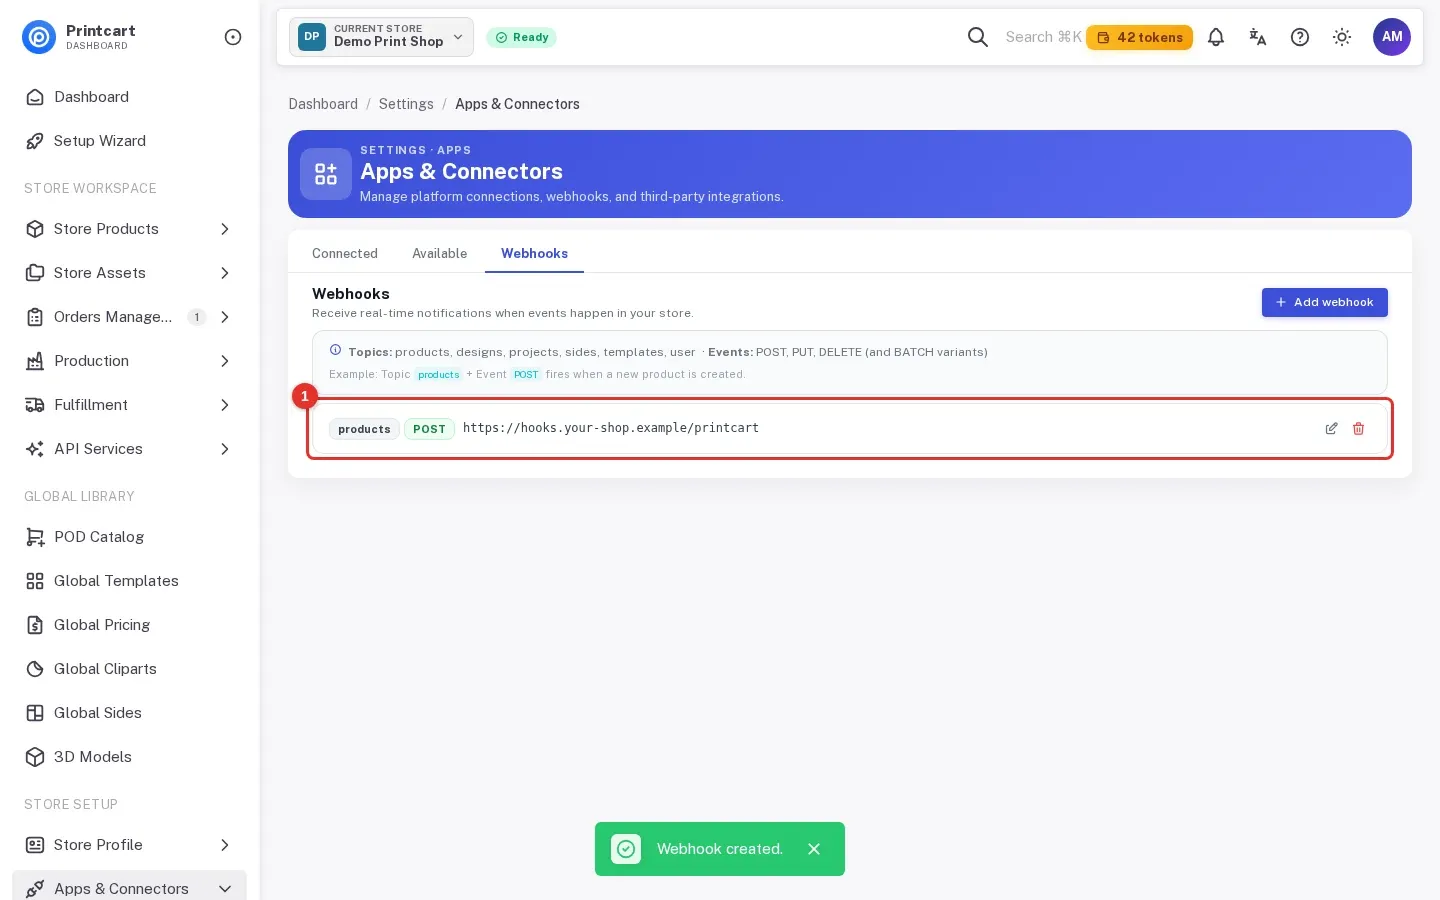
Expected result: A green message says Webhook created. and the webhook is listed with its topic, event and URL. Use the pencil to edit it and the bin to delete it.
Which credential goes where?
Use Sid + Secret on your server for API calls, webhook signature checks, order creation and product sync. Use the Unauth Token in the browser for the designer embed and read-only product fetches. A Publishable key is the browser-safe key in the newer key system; a Secret key is server-only.
What happens to the plugins and apps I already connected?
Nothing. The Printcart WordPress plugin, the Wix app and the Shopify app use the Sid, Secret and Unauth Token. Rotating the Unauth Token does break an embed that still holds the old one, so update every place that uses it straight after you rotate.
How many webhooks can I have?
The limit depends on your plan; read the plan comparison under Wallet & Billing (see Part 7) before you build on webhooks.
All 9 parts of the Printcart Dashboard series
- Sign up and create your store
- Connect your store
- Enable the designer and set up products
- Manage orders and design files
- Review buyer uploads and download files
- Use global templates and cliparts
- Plans, tokens and billing
- API keys and webhooks (you are here)
- Store profile and brand settings
Using a store platform? See the guides for Wix, WordPress and WooCommerce and Shopify. Back to all Printcart tutorials.
What should you do next?
- Connect your store to Printcart
- Plans, tokens and upgrading
- Automating POD orders and fulfillment with the Printcart API
- Browse all Printcart tutorials
Stuck on a step? Message the Printcart team on WhatsApp and include a screenshot of the screen you are on.
Printcart field note
What to verify before you roll out API Keys, Credentials and Webhooks in the Printcart Dashboard
This tutorial is written from Printcart implementation patterns across order operations, approval routing, and fulfillment handoff. Before treating it as complete, test the workflow with one real product, one real design file, and one real order path.
API Keys, Credentials and Webhooks in the Printcart Dashboard — common questions
What do you need before you start?
The screenshots come from a demo account with a demo store called Demo Print Shop and made-up buyer names. Your store name, products and numbers will differ, but the screens and buttons are the same. Secret values are always hidden in the pictures. The key values in the pictures are blurred and are not real.
Which credential goes where?
Use Sid + Secret on your server for API calls, webhook signature checks, order creation and product sync. Use the Unauth Token in the browser for the designer embed and read-only product fetches. A Publishable key is the browser-safe key in the newer key system; a Secret key is server-only.
What happens to the plugins and apps I already connected?
Nothing. The Printcart WordPress plugin, the Wix app and the Shopify app use the Sid, Secret and Unauth Token. Rotating the Unauth Token does break an embed that still holds the old one, so update every place that uses it straight after you rotate.
How many webhooks can I have?
The limit depends on your plan; read the plan comparison under Wallet & Billing (see Part 7 ) before you build on webhooks.
Next steps in Printcart
Connect api keys, credentials and webhooks in the printcart dashboard with catalog setup, templates, production workflows, and implementation support.
Want to put api keys, credentials and webhooks in the printcart dashboard into practice?
Use the related Printcart tool below, or create a free account to start building with the product designer.