Paste one line per student ( student ID, name, class ) into Bulk QR in your Printcart Dashboard, add a Job ID and an optional school name, and click Generate QR PDF . You get an A4 PDF with four cards per page: a QR code, the student's name, class and ID. In our test on 6 October 2026, 12 students cost 12 tokens (1 token per student), the PDF was ready...
Key takeaways
This guide is for school and studio photographers who need a printed card for every student on picture day. The free Bulk QR page on printcart.com only counts your rows. Cards are made in the Dashboard.
What you need before you start
- A Printcart account with a connected store, and tokens in your balance. Bulk QR costs 1 token per student. New to tokens? See Choose which store your tool results are saved to.
- A roster with three things per student: an ID, a name and a class. A spreadsheet is fine. You will paste plain lines, not upload the file.
- A printer for A4 paper and a phone or scanner app to test the codes. The cards in this guide use made-up names.
From roster to printed cards
Step 1Open Bulk QR in the Dashboard
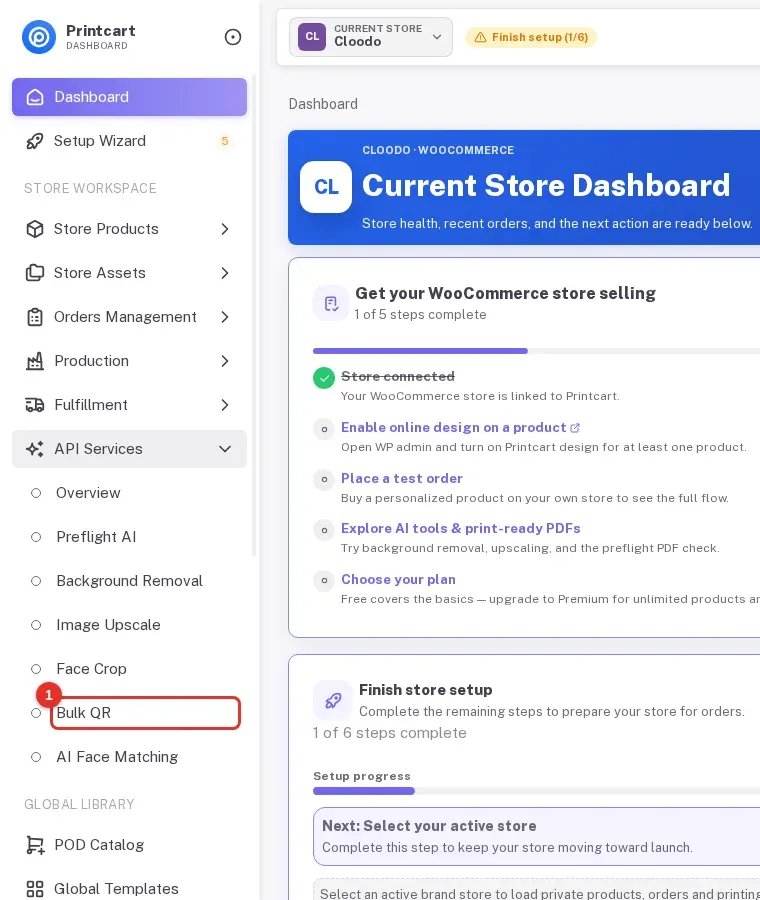
Sign in, open API Services in the left menu and click Bulk QR (1).
Expected result: a page called Bulk QR with a form on the left and an empty preview on the right.
Step 2Check where the result goes
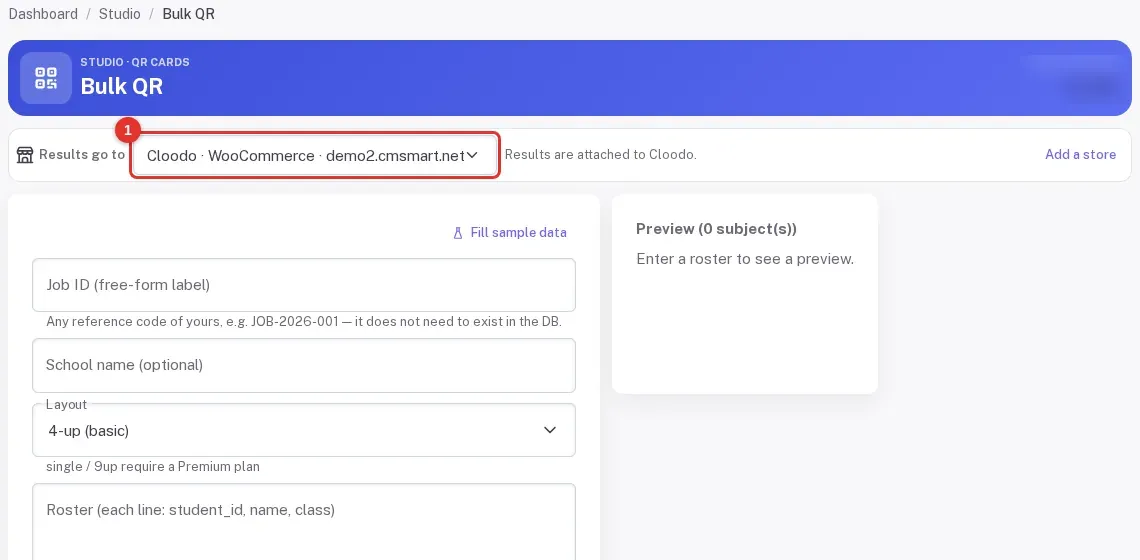
Under Results go to (1), make sure the right store is selected. The PDF is attached to that store. The form has four fields: Job ID, School name, Layout and the roster.
Expected result: your store name shows next to "Results are attached to". The price box says "—" until you add students.
Step 3Prepare the roster as plain lines
Open your spreadsheet and copy only three columns: ID, name, class. Each student is one line, with commas between the three parts:
STU-2026001, Oscar Tate, Year 5A
STU-2026002, Avery Whitfield, Year 6B
- Leave out the header row (the line with "id, full_name, class"). In our first test the form counted it as a student, printed a card for it and charged 1 token. The page now says a header row is skipped, but we did not retest it, so check that the preview count equals your number of students.
- Use commas. The form now says commas, tabs or semicolons work. We only tested commas, so if you paste from Excel and the preview says "0 subject(s)", save the sheet as CSV or replace the separators with commas.
- Keep three columns. The third part is printed under the name as the class. If your CSV has an email in third place, the email is what the preview shows as the class.
Expected result: a block of lines such as the example above, with no header.
Step 4Fill in the form
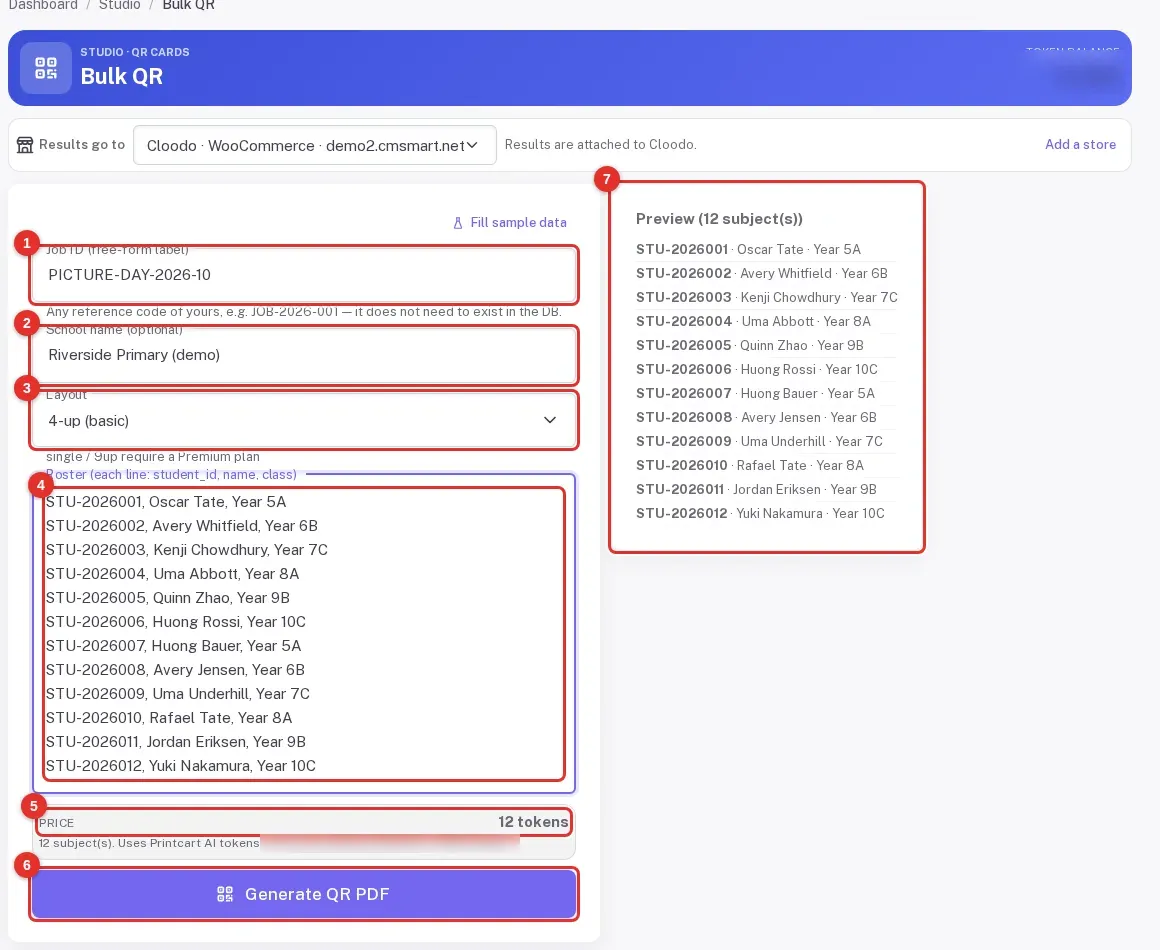
Type a Job ID (1). It is a free label such as PICTURE-DAY-2026-10, and it becomes part of the PDF file name and of every code. Add the School name (2) if you want it printed at the top of each card. Keep Layout on 4-up (3); single and 9-up need a Premium plan. Paste the roster into the box (4).
The preview on the right (7) lists every student it found. The price box (5) shows the cost: 12 students, 12 tokens.
Expected result: the preview shows "Preview (12 subject(s))" and the price matches the number of lines.
Step 5Generate the PDF
Check the preview once more, then click Generate QR PDF (6). Nothing is charged before this click. Our job was finished within 15 seconds.
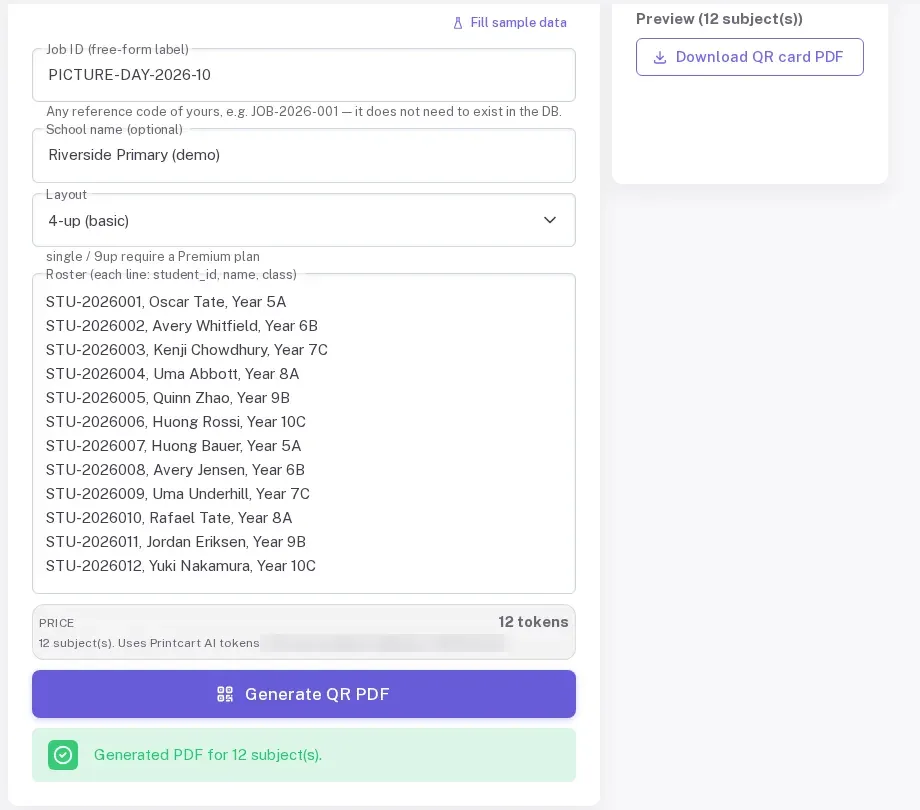
Expected result: a green message "Generated PDF for 12 subject(s)" and a Download QR card PDF button next to the preview.
Step 6Download and look at the cards
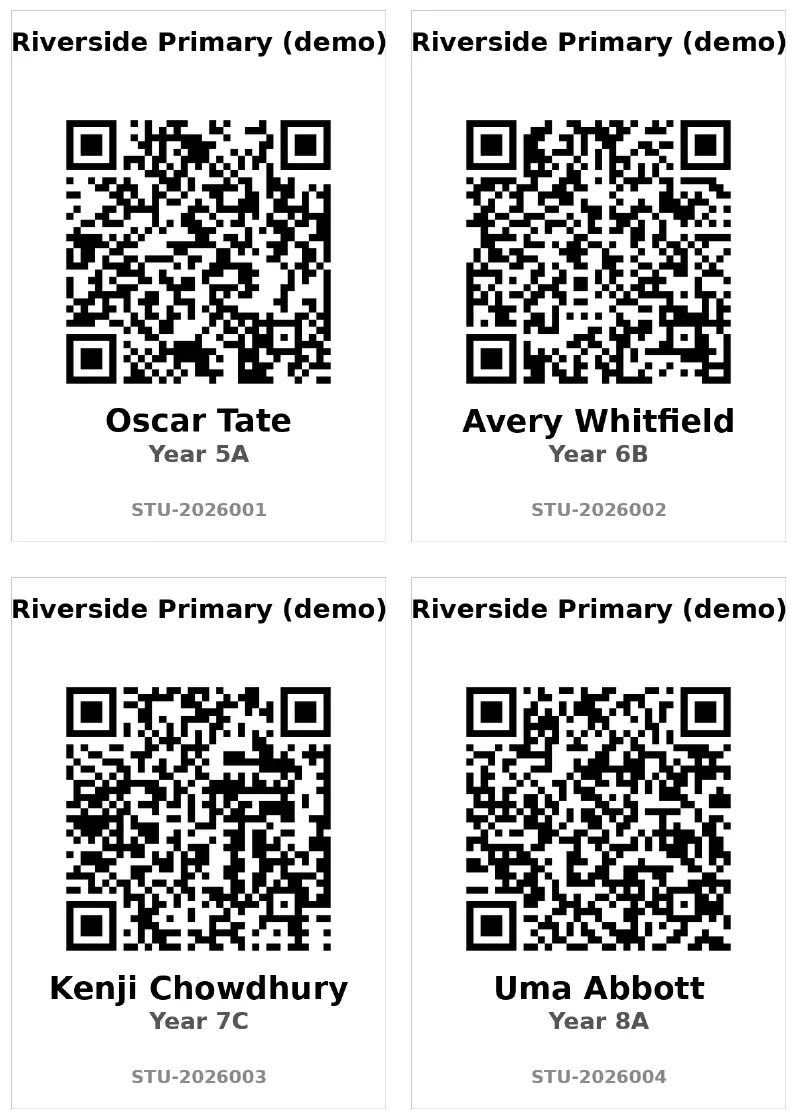
Click Download QR card PDF. The file is named after your Job ID (for example qr_cards_PICTURE-DAY-2026-10_4up.pdf). It is A4 with four cards per page, so 12 students make 3 pages.
Expected result: each card has the school name, a QR code, the student's name and class, and the ID in small grey text.
Step 7Scan a few cards before you print the whole run
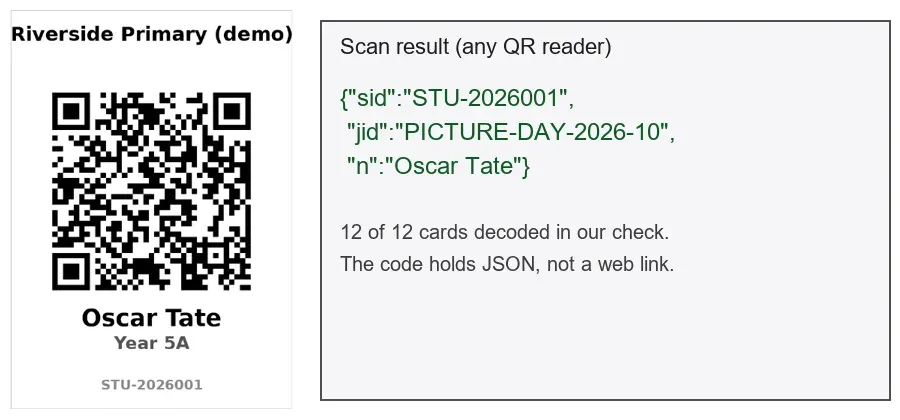
Print one page at 100% scale (no "fit to page") and scan two or three cards with the phone you will use on the day. In our check, all 12 codes decoded (one of two test decoders missed a single card, the other read it, so scan on your own device). In our first test each code held a short piece of text with the student ID, your Job ID and the name, for example:
{"sid":"STU-2026001","jid":"PICTURE-DAY-2026-10","n":"Oscar Tate"}
This is not a web link, so a phone camera shows the text instead of opening a page. Use a scanner app, or your own software that reads the ID, to sort the photos.
Expected result: your scanner shows the ID and name that are printed on the card.
Before and after
Before: 12 lines of text in a spreadsheet. After: 3 A4 pages with 12 cards, made in one click for 12 tokens. A new run with the same Job ID costs tokens again.
Troubleshooting (what actually went wrong in our tests)
- "0 subject(s)" and an empty preview. Your lines may use a separator the form does not read, or have an ID but no comma. Use commas between ID, name and class.
- A card with "id" or "full_name" on it. The header row was pasted and counted as a student. Remove it before you generate, and check the preview count.
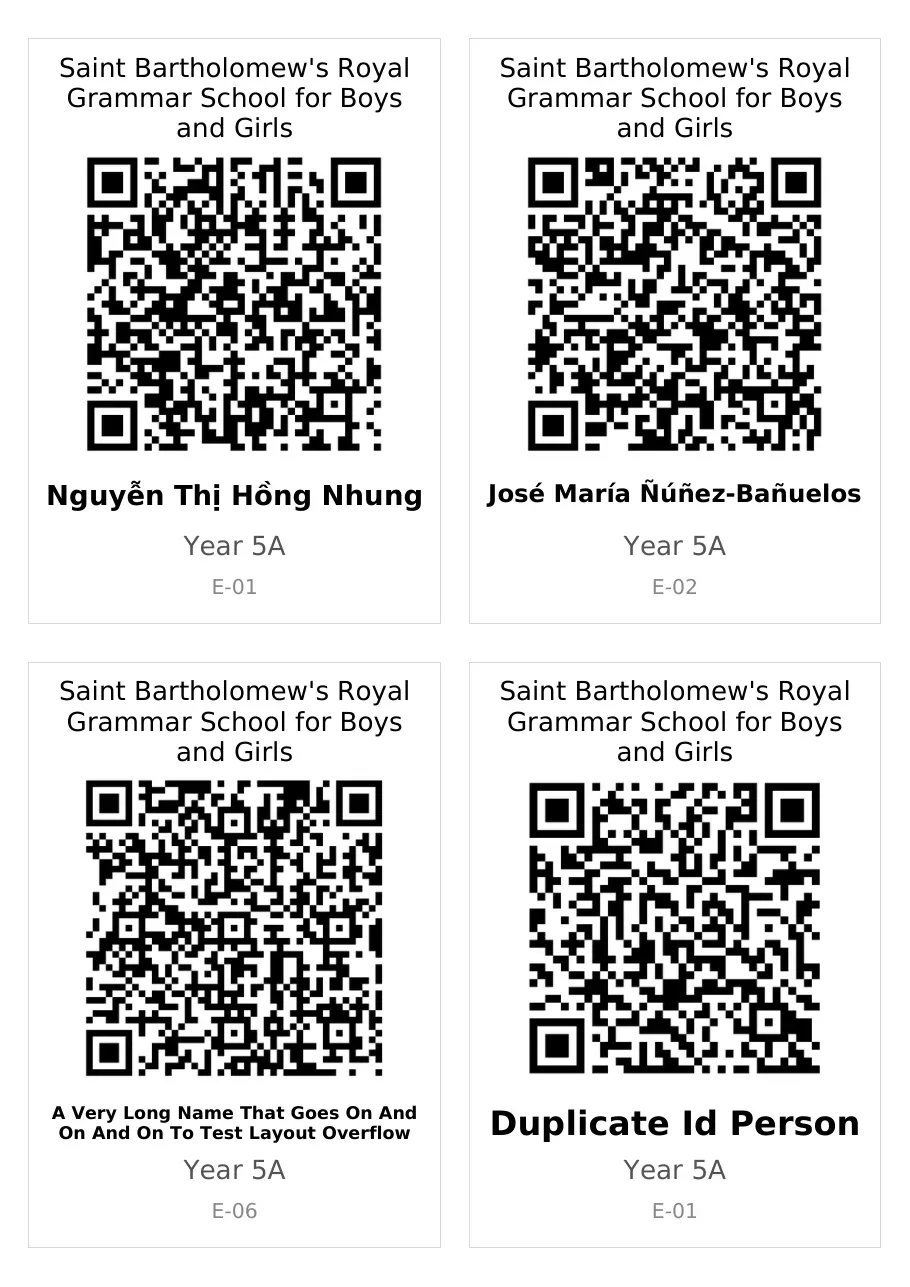
- Long names. In our second test a school name of 58 characters wrapped onto three lines on every card, and a student name of about 70 characters shrank onto two lines. Nothing was cut off. Still look at the PDF before you print a whole class.
- Characters the cards cannot print. Vietnamese and Spanish accents printed correctly. When we pasted Japanese characters and an emoji, the page refused to generate, listed the characters that cannot be printed, and charged nothing. Replace those names with Latin text, or leave the name out and rely on the ID.
- The same ID twice. The page shows a warning ("Duplicate student ID") but still made both cards, each with the same ID. Fix the IDs in your sheet first, because photos cannot be matched to the right person otherwise.
- Privacy of the PDF. In our first test the download link opened without signing in and its name was built from the Job ID. In our second test the file name had a long random ending, so the link cannot be guessed, but anyone who has the link can still open it without signing in. In the first test the student's name was also inside each code (we did not decode the new file). Do not put a student's name in the Job ID, share the file only with your team, and do not post the cards or the link in public places.
- Very large rosters. The form showed a price for 500 rows, and for 502. We did not run those batches, so we cannot tell you whether a very large run succeeds in one go. Try 100 first.
FAQ
How much does Bulk QR cost?
1 token per student. The price box shows the total before you click. A job of 12 students took 12 tokens and one of 6 took 6.
Can I upload a CSV file?
Not at the moment. You paste lines into the roster box. A CSV opened in a text editor works, as long as you remove the header and keep three comma-separated columns.
Do I need a Premium plan?
No. The 4-up layout is included. Single-card and 9-up layouts need a Premium plan.
Is there a free version?
The Bulk QR page lets you paste a list and see how many rows it finds. Nothing is generated there.
Can I match the cards to faces afterwards?
Cards help you name the files on picture day. For sorting event photos by person, see AI Face Matching for Event and School Photography.
Next steps
- Back to the tool page: Bulk QR card generator.
- Crop every portrait to the same frame: Auto Face Crop for School and Studio Photos.
- Older overview of the same tool: Generate Bulk QR Cards for Photo Fulfillment.
- More in this series: Photo commerce tools tutorials.
Process whole classes and keep your tokens topped up. See the token plans: AI wallet pricing.
Printcart field note
What to verify before you roll out Make QR Cards for Every Student from a Roster in the Printcart Dashboard
This tutorial is written from Printcart implementation patterns across order operations, approval routing, and fulfillment handoff. Before treating it as complete, test the workflow with one real product, one real design file, and one real order path.
Make QR Cards for Every Student from a Roster in the Printcart Dashboard — common questions
How much does Bulk QR cost?
1 token per student. The price box shows the total before you click. A job of 12 students took 12 tokens and one of 6 took 6.
Can I upload a CSV file?
Not at the moment. You paste lines into the roster box. A CSV opened in a text editor works, as long as you remove the header and keep three comma-separated columns.
Do I need a Premium plan?
No. The 4-up layout is included. Single-card and 9-up layouts need a Premium plan.
Is there a free version?
The Bulk QR page lets you paste a list and see how many rows it finds. Nothing is generated there.
Next steps in Printcart
Connect make qr cards for every student from a roster in the printcart dashboard with catalog setup, templates, production workflows, and implementation support.
Want to put make qr cards for every student from a roster in the printcart dashboard into practice?
Use the related Printcart tool below, or create a free account to start building with the product designer.